

Custom Risk Scores
Override the standard CVSS severity of a vulnerability with your organization's own context-aware risk score.
Enterprise feature
Available on: Business, Enterprise.
Overview
Custom Risk Scores let you override the standard CVSS severity of a vulnerability issue with a score that reflects your organization's internal risk exposure. With Custom Risk Scores, your security team can assign a context-aware severity score to any vulnerability issue, make it the primary severity displayed across FOSSA, and filter and triage issues based on your own assessments rather than third-party scores alone.
How it works
When you assign a custom risk score to a vulnerability issue:
- The custom score replaces the CVSS badge as the primary severity displayed in the issues list and issue details.
- The original CVSS score remains visible in the Vulnerability Details section for reference.
- The custom score, the reason you provided, and who assigned it are all displayed in the issue details drawer.
- The score can be edited or removed at any time, reverting the issue back to its standard CVSS severity.
All actions (create, update, delete) are recorded in FOSSA's Audit Log.
Severity thresholds
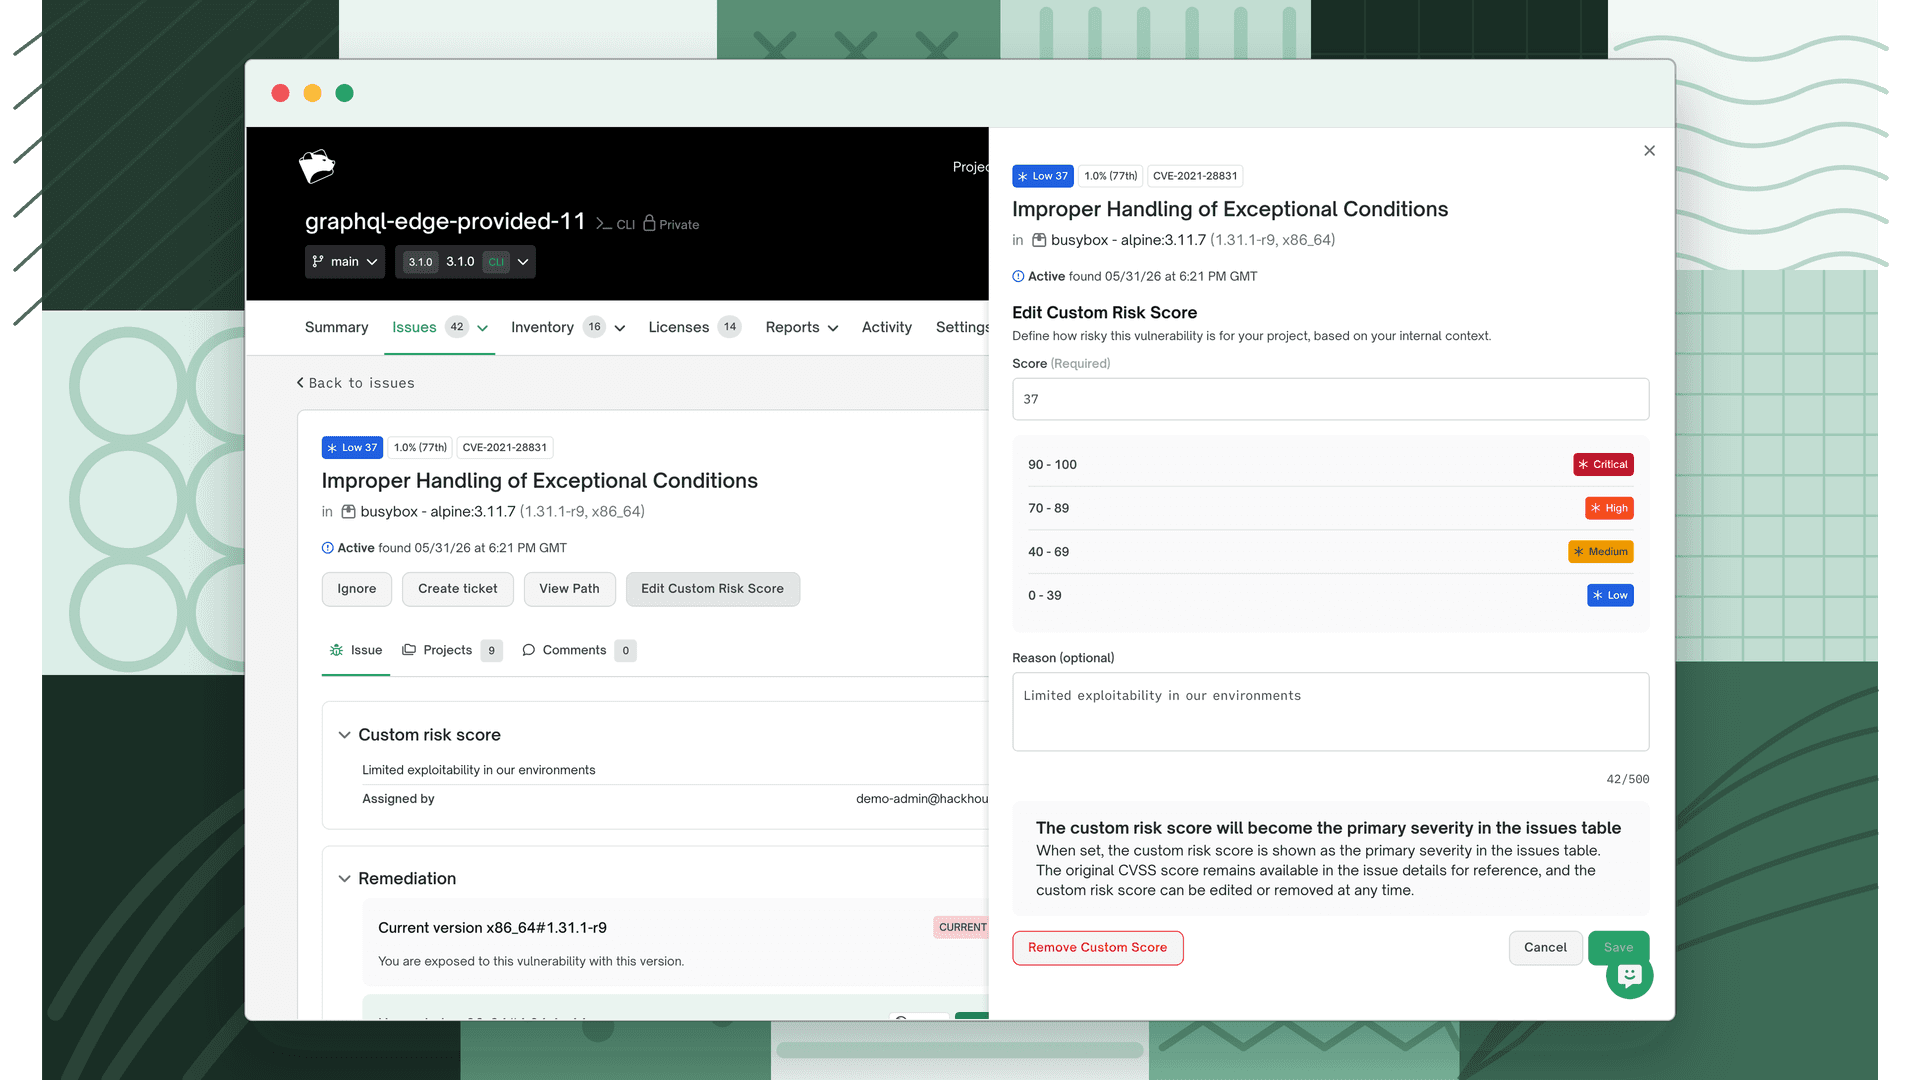
Custom Risk Scores use a 0–100 scale. The score maps to severity levels as follows:
| Score Range | Severity Level |
|---|---|
| 90 – 100 | Critical |
| 70 – 89 | High |
| 40 – 69 | Medium |
| 0 – 39 | Low |
Unlike CVSS (where a null score means the severity is unknown), a custom risk score of 0 is an intentional Low rating, not an absence of data.
Assigning a custom risk score
From the UI
- 1
Open the Security tab
Navigate to a Project or Release Group and open the Issues → Security tab.
- 2
Open the issue drawer
Click on a vulnerability issue to open the issue details drawer.
- 3
Start assigning a score
In the action buttons area, click Assign custom risk score (or Edit custom risk score if one already exists).
- 4
Enter the score and reason
In the drawer that opens:
- Enter a score between 0 and 100 (whole numbers only).
- Optionally provide a reason (up to 500 characters) explaining why you chose this score. For example: "Not exploitable in our environment, internal service only."
- 5
Save
Click Save. The issues list refreshes automatically to reflect the new custom risk score.
From the API
You can also manage custom risk scores programmatically using the FOSSA API.
POST /api/custom-risk-scores/:issueId?scope[type]={scope}&scope[id]={scopeId}Path parameter:
issueId: The numeric ID of the vulnerability issue.
Query parameters:
scope[type]: Eitherprojectorrelease_group.scope[id]: The project locator (e.g.npm+my-package) or release group ID.
curl -X POST "https://app.fossa.com/api/custom-risk-scores/12345?scope[type]=project&scope[id]=npm+my-package" \ -H "Authorization: Bearer $FOSSA_TOKEN" \ -H "Content-Type: application/json" \ -d '{"score": 25, "reason": "Not exploitable in our environment — internal service only."}'Request body fields:
| Field | Type | Required | Description |
|---|---|---|---|
score | integer | Yes | Integer between 0 and 100 (inclusive). |
reason | string | No | Justification for the score. Max 500 characters. |
Response (201 Created):
{ "issueId": 12345, "score": 25, "reason": "Not exploitable in our environment — internal service only.", "scope": "project", "scopeId": "npm+my-package"}Editing a custom risk score
From the UI
- 1
Open the issue drawer
Open the issue details drawer for a vulnerability that already has a custom risk score.
- 2
Edit the score
Click Edit custom risk score.
- 3
Save your changes
Update the score and/or reason, then click Save.
From the API
PATCH /api/custom-risk-scores/:issueId?scope[type]={scope}&scope[id]={scopeId}curl -X PATCH "https://app.fossa.com/api/custom-risk-scores/12345?scope[type]=project&scope[id]=npm+my-package" \ -H "Authorization: Bearer $FOSSA_TOKEN" \ -H "Content-Type: application/json" \ -d '{"score": 60, "reason": "Upgraded mitigations in place — downgraded from Critical."}'Pass "reason": null to clear an existing reason without providing a new one.
Removing a custom risk score
From the UI
- 1
Open and edit
Open the issue details drawer and click Edit custom risk score.
- 2
Remove the score
Click Remove Custom Score and confirm. The issue reverts to its standard CVSS severity.
From the API
DELETE /api/custom-risk-scores/:issueId?scope[type]={scope}&scope[id]={scopeId}curl -X DELETE "https://app.fossa.com/api/custom-risk-scores/12345?scope[type]=project&scope[id]=npm+my-package" \ -H "Authorization: Bearer $FOSSA_TOKEN"Returns 204 No Content on success.
Filtering issues by severity source
On the Issues → Security filter panel (within a project or release group), a Severity Source filter lets you narrow results based on how the severity was determined:
- Standard (CVSS): Shows issues whose displayed severity is derived from the standard CVSS score.
- Custom Risk Score: Shows only issues that have a custom risk score assigned.
You can select one or both options. The filter is not available in the Global issues view, where custom risk scores are not applied.
Filtering via the API
Use the filter[severitySource][] and filter[severity][] query parameters on the issues endpoint:
GET /api/v2/issues?category=vulnerability
  &scope[type]=project
  &scope[id]={projectLocator}
  &filter[severitySource][0]=custom
  &filter[severity][0]=critical
severitySource accepts standard and/or custom. When omitted, the filter defaults to standard CVSS behavior.
Viewing custom risk score details
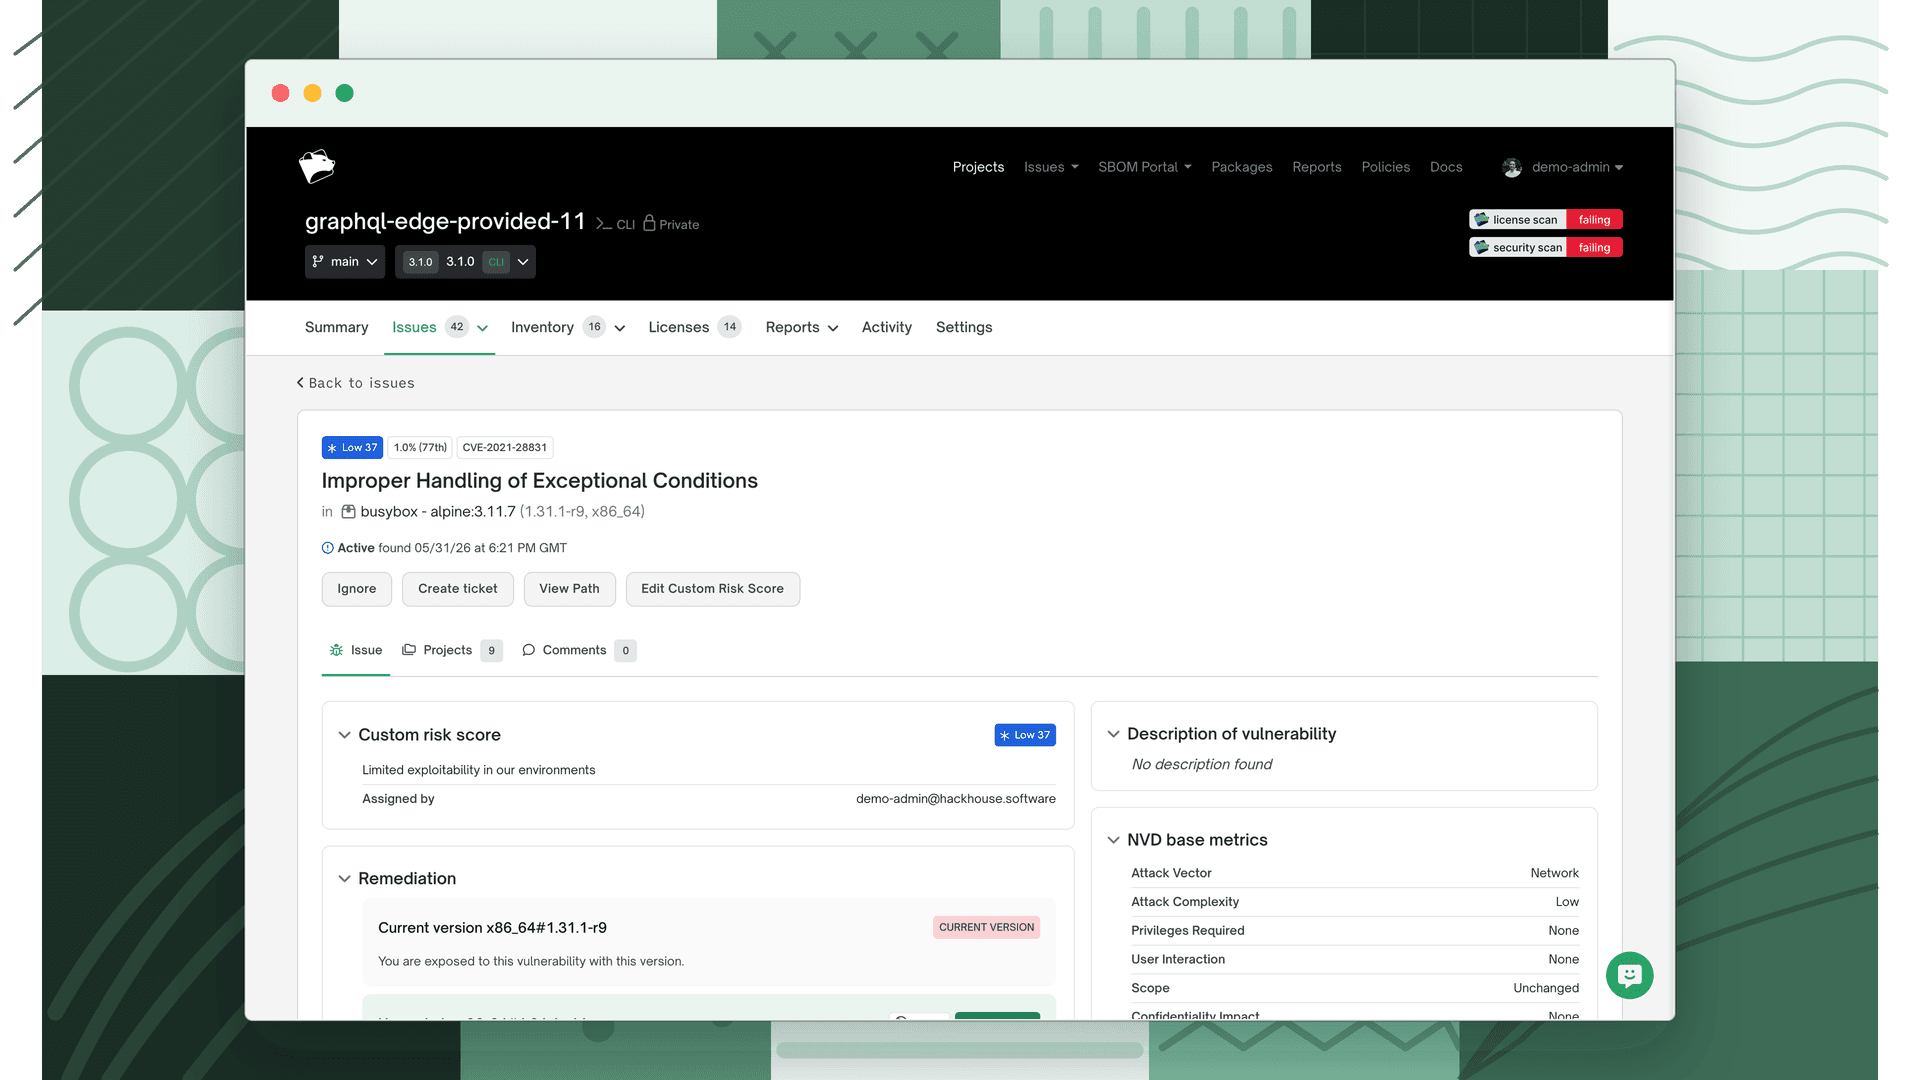
When a vulnerability issue has a custom risk score, the issue details drawer displays a dedicated Custom Risk Score section showing:
- The score and its severity badge (e.g., Low 25).
- The reason provided, or "No reason given" if none was entered.
- Assigned by: the email address of the team member who created the score.
The original CVSS score remains visible in the Vulnerability Details section below.
Retrieving custom risk scores via the Issues API
The GET /api/v2/issues endpoint includes a customRiskScore field in each vulnerability issue response when a custom score has been assigned in the requested scope:
{ "results": [ { "id": 12345, "title": "CVE-2024-XXXX in lodash", "cvssScore": 9.8, "customRiskScore": { "score": 25, "reason": "Not exploitable in our environment.", "createdBy": "alice@example.com" } } ]}The customRiskScore field is omitted when no custom score exists for that issue in the given scope, or when querying at global scope.
Permissions
Managing custom risk scores requires Edit permission on the project or release group. Users with only View permission can see custom risk scores but cannot assign, edit, or remove them.
Audit log
All custom risk score actions are recorded in FOSSA's Audit Log:
| Action | Logged When |
|---|---|
| Created | A custom risk score is assigned to an issue. |
| Updated | An existing score or reason is changed. |
| Deleted | A custom risk score is removed. |
Each entry includes the acting user, the issue, scope, and the old and new score values where applicable.
Frequently asked questions
Does a custom risk score affect policy evaluation? Custom risk scores affect how issues are displayed and filtered in FOSSA. Check your organization's policy configuration for whether policies evaluate standard CVSS severity or custom risk score severity.
Can I assign a custom risk score at the global level? No. Custom risk scores are scoped to a specific project or release group. This ensures that a score reflects the context of how a dependency is used in a particular codebase, not universally across all projects.
What happens if I remove a custom risk score? The issue reverts to displaying its standard CVSS-based severity. The custom score history is preserved in the audit log.
Can the same vulnerability have different custom risk scores in different projects? Yes. Because scores are scoped to a project or release group, you can assign a different score to the same vulnerability depending on how it is used in each context.
Is the original CVSS score still available after I assign a custom score? Yes. The original CVSS score remains visible in the Vulnerability Details section of the issue drawer at all times.
What's next
- Reviewing Security Issues: Filter and sort issues using your custom risk scores to prioritize remediation.
- Auto-Ignore Rules: Suppress issues that don't apply to your environment across future scans.