

Bitbucket Server
Create an application link between your Bitbucket Server and FOSSA On-Prem so users can import and scan their internal repos.
Enterprise feature
Automatic webhook updates require a paid FOSSA subscription; otherwise configure webhooks manually.
Overview
Note
This integration is only available on FOSSA On-Prem. This guide is written for Bitbucket Server v4.0.6 and later.
Connect Bitbucket Server to FOSSA so users can browse and import their internal repositories. The setup has three parts: creating an OAuth1 Application Link so users can authenticate, adding a fossabot service account so FOSSA can fetch code, and configuring webhooks so FOSSA rescans on every push.
Setting up the Application Link
The Application Link lets users log in to Bitbucket Server and view their projects through FOSSA.
- 1
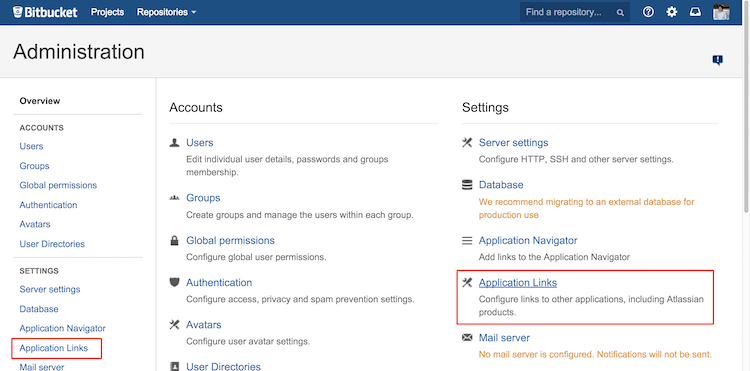
Open Application Links
In Bitbucket Server, go to Settings → Application Links.
- 2
Create a link to FOSSA
Click Create link and enter FOSSA's internal IP address as the application URL.

Fill in
fossafor all options when prompted.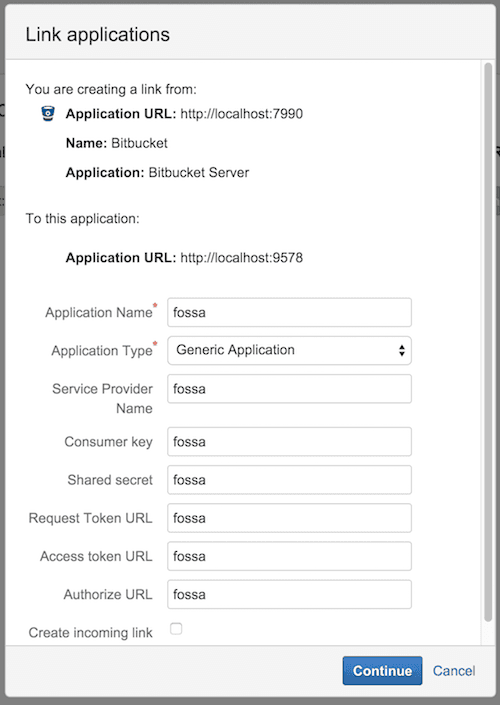
- 3
Generate an RSA keypair
On the machine where FOSSA On-Prem is running, generate a 2048-bit RSA keypair. You will use the public key in Bitbucket and the private key in FOSSA's configuration.
Shellopenssl genrsa -out privkey.pem 2048openssl rsa -pubout -in privkey.pem -out pubkey.pemKeep both files. You will need them in the next two steps.
- 4
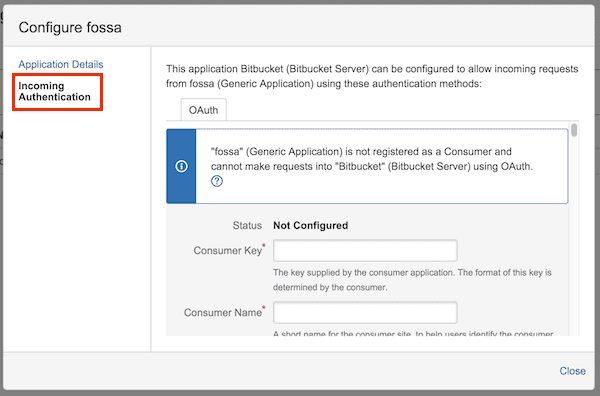
Configure Incoming Authentication
In the Application Links list, find the link you just created and click Edit → Incoming Authentication.

Fill in the following fields and click Save (leave all others blank):
Field Value Consumer Key fossaConsumer Name fossaPublic Key (paste the contents of pubkey.pemgenerated in the previous step)Warning
The Public Key field must contain the RSA public key you generated in the previous step, not a copied example. Using someone else's public key will mean FOSSA cannot authenticate.
Users can now connect their Bitbucket Server accounts to FOSSA.
Adding the fossabot service account
FOSSA requires a fossabot account on your Bitbucket Server instance with global read access to fetch code for analysis.
Note
fossabot is not visible to end users of FOSSA. It acts as an internal proxy for fetching code. Users can only browse and import repositories they already have access to in Bitbucket Server.
- 1
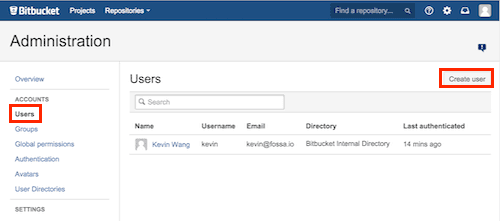
Create the fossabot user
In Bitbucket Server, go to Settings → Accounts → Users and click Create User.
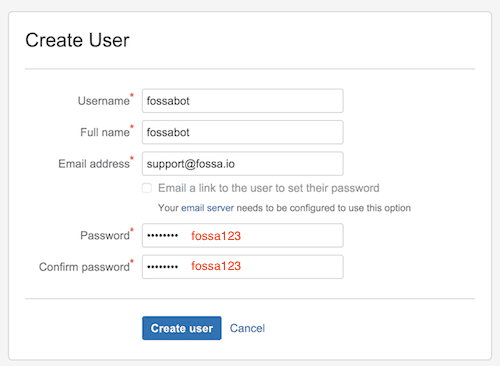
Use the username and password from FOSSA's
config.env(the defaults are shown below, change them if your deployment uses custom values):Shellbitbucket_server__credentials__basic__username=fossabotbitbucket_server__credentials__basic__password=fossa123 - 2
Grant global read access
fossabotmust be able to clone any repository in your Bitbucket Server instance. The simplest way is to grant admin privileges at Settings → Accounts → Global Permissions.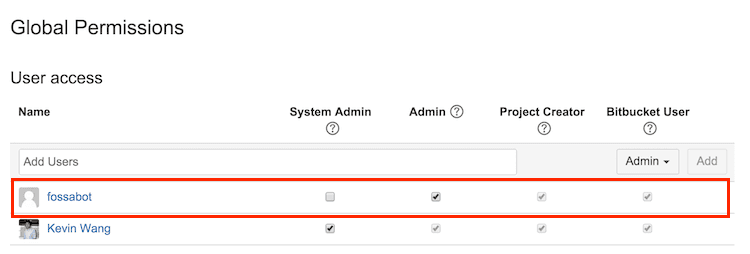
If you need a custom role instead of full admin, ensure the account still has global read access by verifying it can clone repos across different projects.
Users on FOSSA can now browse and import their Bitbucket Server repositories via Bulk Import.
Configuring automatic updates
After importing a project, configure webhooks in both FOSSA and Bitbucket Server so that new commits trigger a rescan automatically.
- 1
Enable webhook updates in FOSSA
Open the imported project in FOSSA and go to Settings → Update Hooks. Select Webhook as the update method and click Save Changes. Copy the Webhook Update URL shown on the page.
- 2
Create a webhook in Bitbucket Server
Bitbucket Server and Data Center have webhooks built in. In the project's repository settings, open Webhooks and click Create webhook. See Atlassian's Manage webhooks guide for details. (Older instances without native webhooks can use the legacy Post-Receive Webhooks add-on instead.)
- 3
Point the webhook at FOSSA
Paste the Webhook Update URL from step 1 as the webhook URL, enable the webhook for repository push events, and save.
On-Prem Helm configuration
If you are deploying FOSSA On-Prem via Helm, configure Bitbucket Server in your input-values.yaml. The privateKey must match the private key you generated during the Application Link setup.
Warning
The input-values.yaml schema is defined in the FOSSA On-Prem Helm chart, not the application code. Confirm the exact key names against your installed chart version before deploying.
bitbucketEnterprise: url: http://bitbucket.your-company.com cloneWithSSH: false # set to true to clone over SSH; also configure fetchers.git ## OAuth1 credentials (from Application Link setup) clientId: fossa privateKey: |- -----BEGIN RSA PRIVATE KEY----- # paste the contents of privkey.pem here -----END RSA PRIVATE KEY----- ## Basic auth credentials (must match fossabot account) username: fossabot password: fossa123If you have any problems, contact support at support@fossa.com.