

Jira
Connect FOSSA to Jira Cloud or Server to export issues as tickets and automatically resolve them when closed in Jira.
Enterprise feature
Available on: Business, Enterprise.
Overview
FOSSA's Jira integration lets your team track open-source compliance and security issues without leaving the tools they already use. Once connected, you can export FOSSA issues as Jira tickets and have those issues automatically resolve in FOSSA when the corresponding Jira ticket is closed.
The integration provides two capabilities:
- Export issues: create Jira tickets from any FOSSA issue, individually or in bulk.
- Auto-resolve via webhook: when a Jira ticket is marked resolved, FOSSA automatically resolves the linked issue.
How it works
FOSSA authenticates to Jira using basic credentials (email + API token for Cloud; username + password for Server). When you export an issue, FOSSA calls Jira's REST API v2 (POST /rest/api/2/issue/bulk) and stores the returned ticket ID to track the link.
For auto-resolution, you register a FOSSA-generated webhook URL in your Jira instance. Jira sends an event to FOSSA when a ticket is updated or deleted. FOSSA checks whether the ticket has a resolution set and, if so, marks the linked FOSSA issue as resolved.
Required Jira permissions
| Capability | Required Jira permission |
|---|---|
| Export issues | Basic Jira product access (create and interact with issues) |
| Auto-resolve via webhook | Jira Administrator or Product Admin for Jira (to create and manage webhooks) |
In enterprise environments you may need your IT or Jira administrator to grant these permissions. You can also create a dedicated permission group that combines both levels so a single service account covers the full integration.
See Atlassian's Default groups and permissions guide for details.
Connecting Jira to FOSSA
- 1
Open Jira integration settings
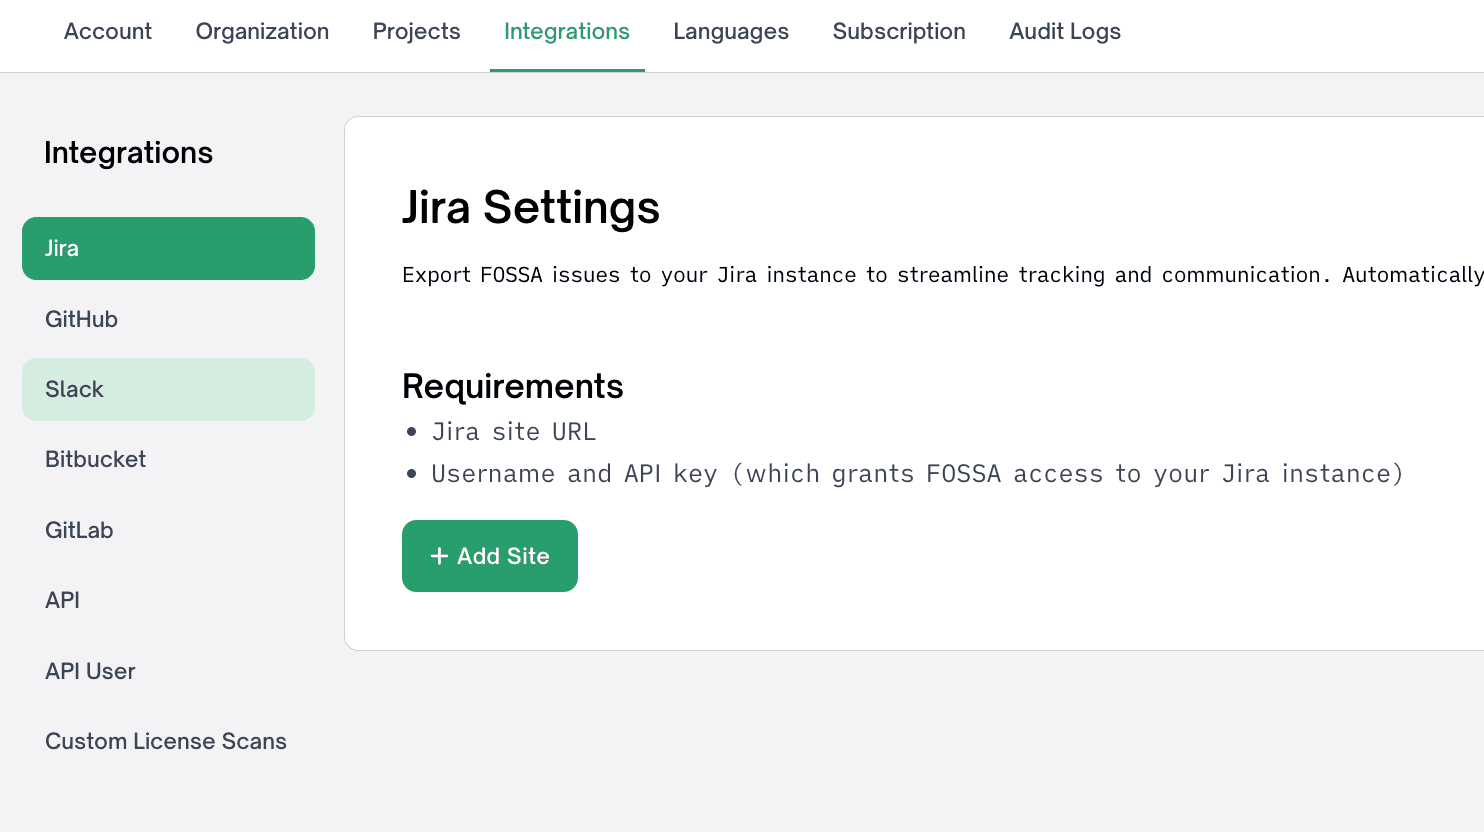
Go to Settings → Integrations → Jira. If you have not configured a site yet, click Add Site.
- 2
Enter a name and site URL
Give the integration a unique name, which is helpful if you configure multiple Jira sites. Then enter your Jira site's base URL only, for example
your-org.atlassian.netfor Jira Cloud. - 3
Add project key(s)
Enter at least one Jira project key, the short identifier that prefixes every issue ID in that project (for example,
PROJinPROJ-123). You can find it in the project URL or in Project Settings → Details under Key.Multiple keys are supported if you route issues to more than one project.
- 4
Set issue type and labels (optional)
- Issue type: must exactly match a type configured in your Jira instance (e.g.,
Bug,Task,Story). FOSSA defaults toTaskif none is specified. - Labels: free-form tags that do not need to exist in Jira beforehand. A label like
FOSSAmakes exported tickets easy to filter.
Note
Using a consistent label or issue type for all FOSSA-exported tickets makes them easy to find in Jira.
- Issue type: must exactly match a type configured in your Jira instance (e.g.,
- 5
Save the site
Click Save. FOSSA will generate a webhook URL for this site; copy it now if you plan to set up auto-resolution.
Configuring credentials
FOSSA authenticates with Jira via basic auth. Use a dedicated service account rather than a personal user account.
FOSSA authenticates using your Jira user's email address and an API token.
Warning
FOSSA does not currently support scoped (granular) API tokens. Use a classic API token.
To create a token, follow Atlassian's guide on managing API tokens.
The account must have permission to create, resolve, and modify issues in the target projects.
Adding custom fields
Danger
FOSSA supports simple text-based custom fields only. To create a custom field in Jira first, follow Atlassian's guide.
- 1
Open custom fields in FOSSA
On the Jira integration settings page, click Add Field under the custom fields section.
- 2
Find the field ID in Jira
In your Jira site, go to Project Settings → Issues → Fields. Click the pencil (edit) icon in the top-right of the table.

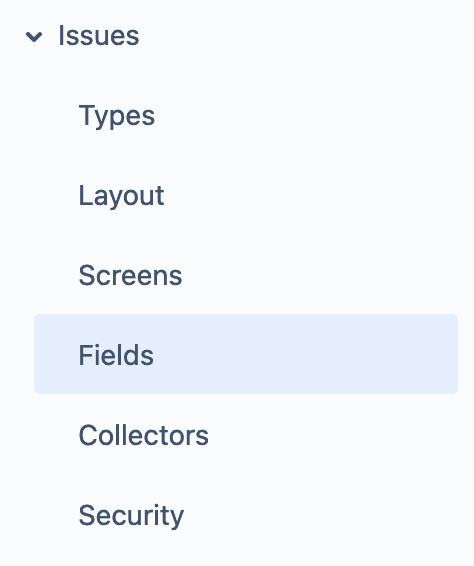

Click Edit on the field you want to add. In the URL you will see
orderableFieldId=customfield_XXXXX; copy only the numeric portion (e.g.,10031).
- 3
Configure the field in FOSSA
Enter the numeric Field ID, a display name (usually matching the Jira field name), and an optional default value. Check Required if every exported issue should include this field.
Request headers
If your Jira configuration requires additional authentication headers, add them at the bottom of the Jira settings page. This is an advanced option not needed for standard Jira Cloud integrations.
Setting up the webhook
The webhook lets Jira notify FOSSA when a ticket is closed, which automatically resolves the linked FOSSA issue.
- 1
Copy your webhook URL from FOSSA
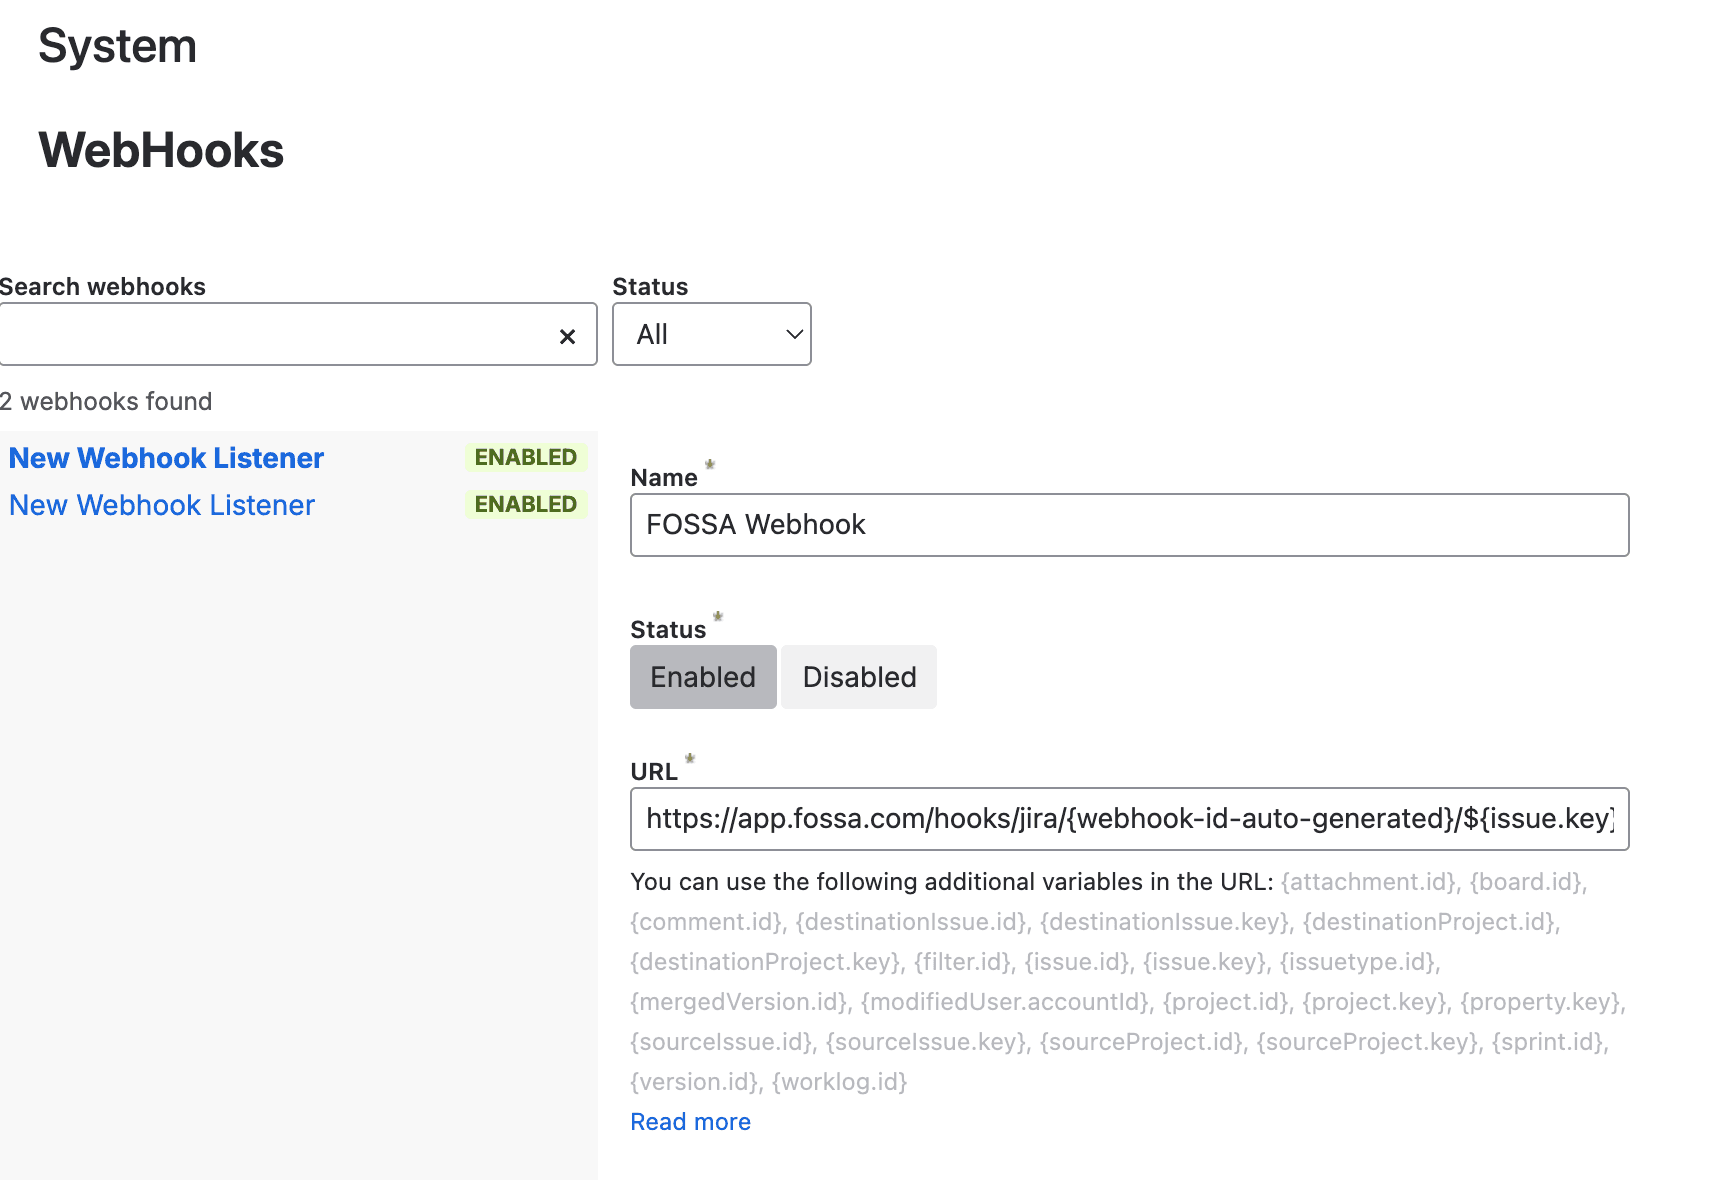
After saving your Jira site settings, FOSSA generates a unique webhook URL for that site. Copy it from the integration settings page. Each Jira site you configure gets its own URL.
- 2
Open webhook settings in Jira
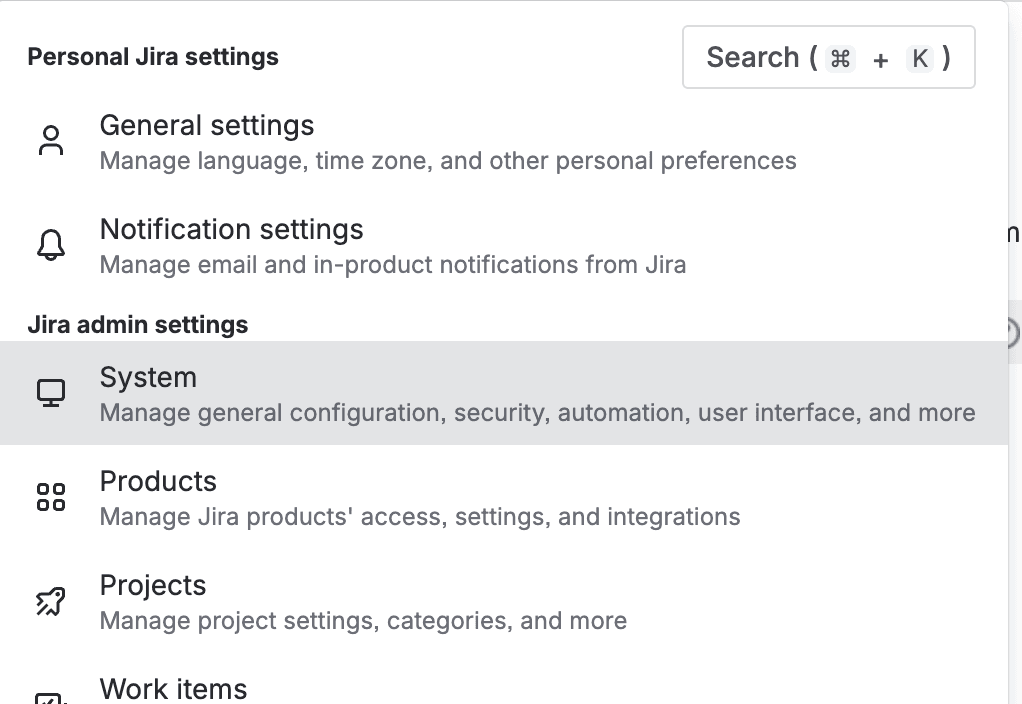
In Jira, click the Settings gear in the top-right corner. Under Jira admin settings, click System.
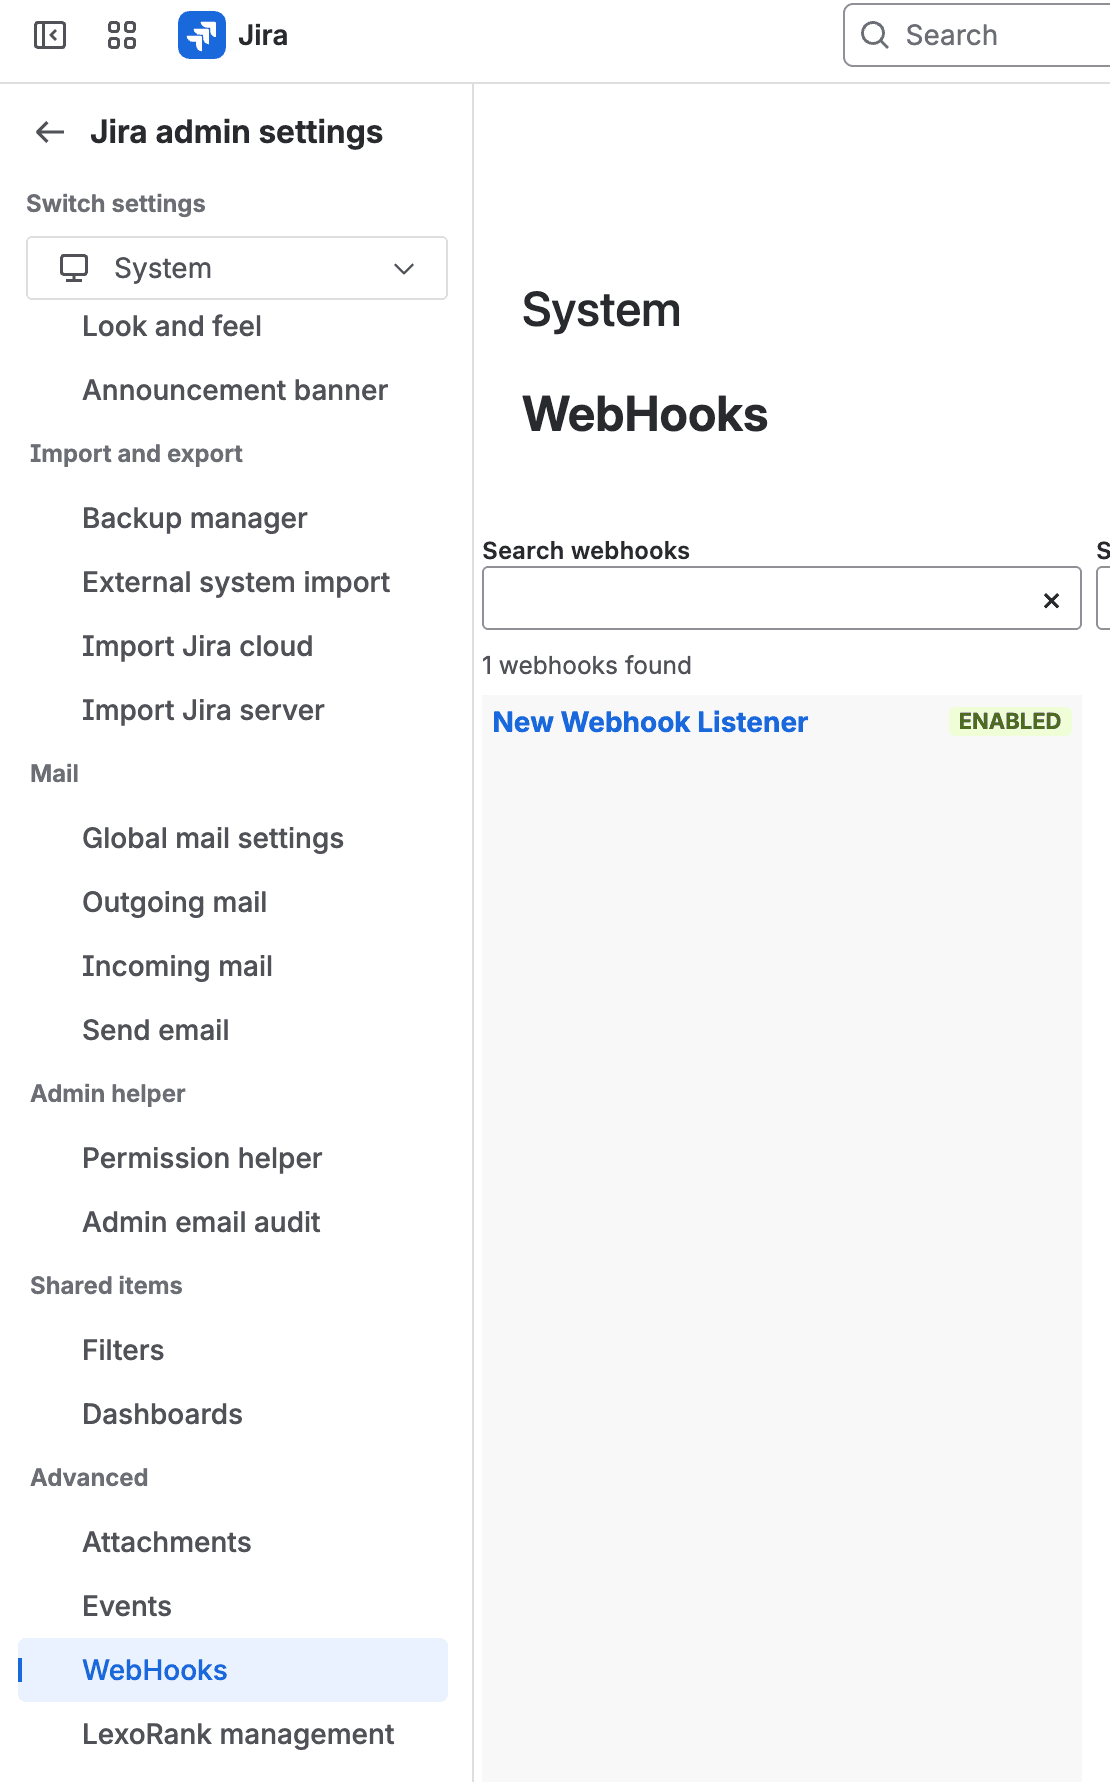
In the left panel under Advanced, click WebHooks.
- 3
Create a new webhook
Click Create a WebHook. Enter the FOSSA webhook URL as the endpoint.

- 4
Select trigger events
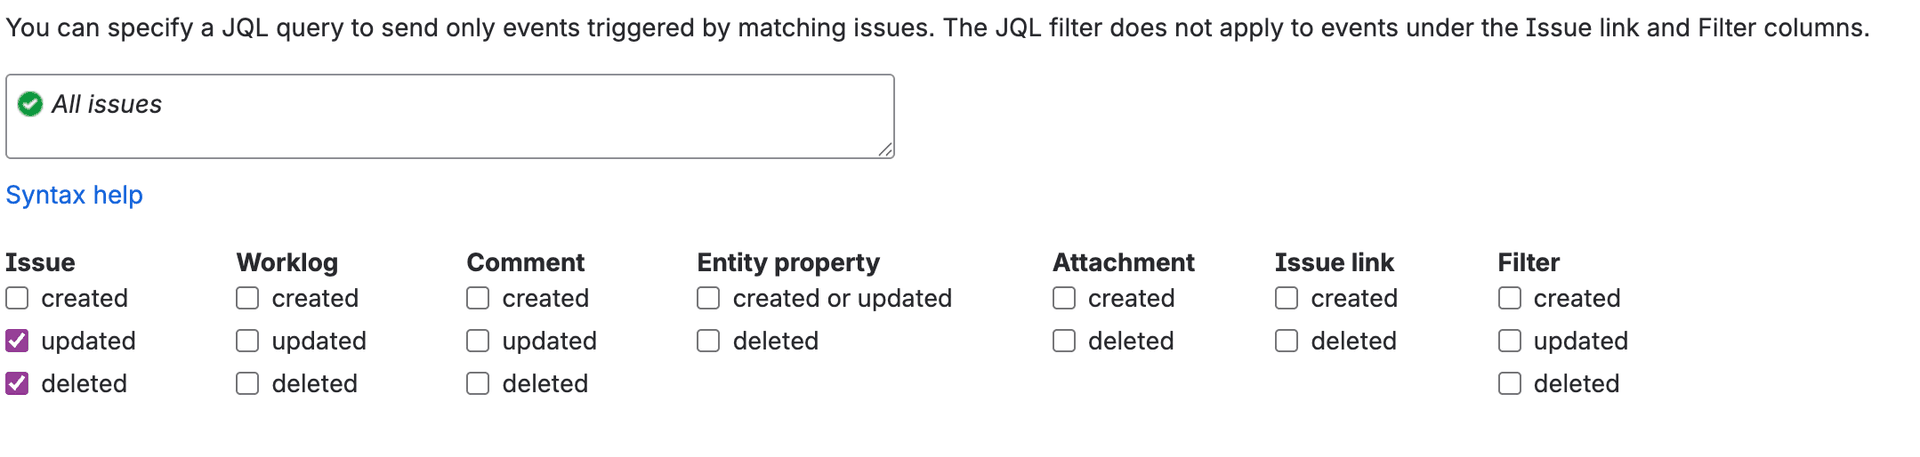
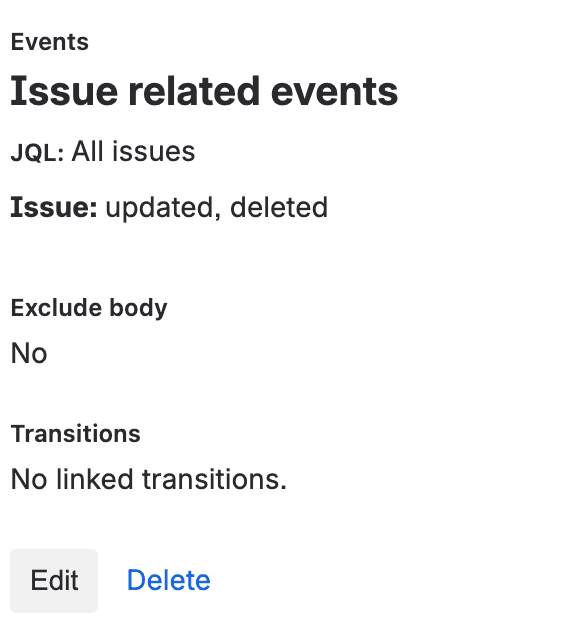
Under Issues, enable the updated and deleted events.
- 5
Save and verify
Save the webhook. It will appear in the webhook list with the URL and events you configured.
Creating tickets from FOSSA
Creating a ticket for a single issue
- 1
Select the issue
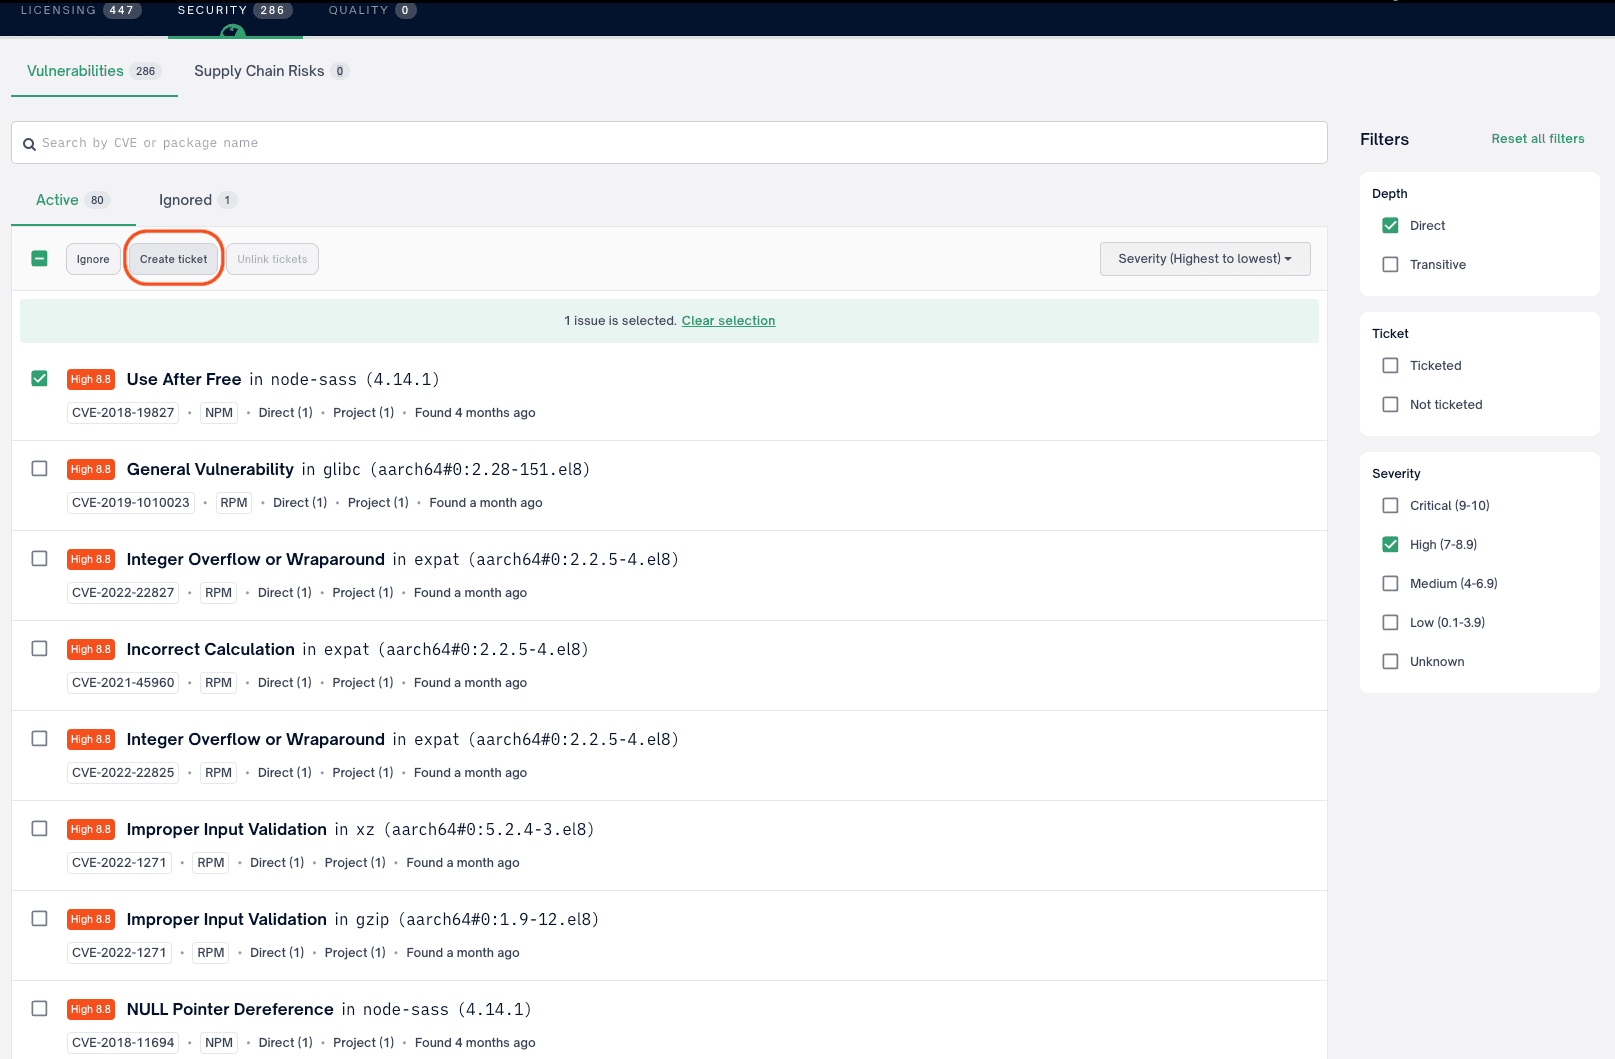
On the FOSSA Issues page, check the box next to the issue you want to ticket.
- 2
Fill in the ticket details
In the Create Ticket modal, select the Jira Site and Project ID. Optionally set the issue type and label, then click Create ticket.
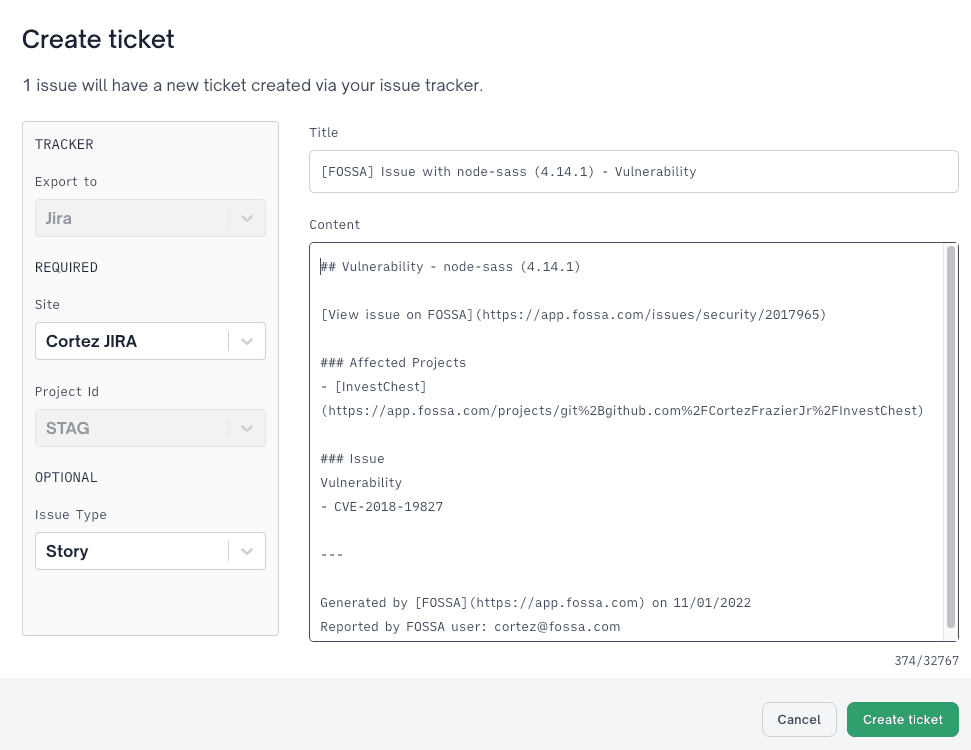
The new Jira ticket includes the issue details and a live link back to FOSSA. Use the Ticketed filter on the Issues page to find it.
Creating tickets for multiple issues
Select multiple issue checkboxes, or use the bulk-select checkbox to select all on the page, then click Select all to include every matching issue. Click Create Ticket, choose your Site and Project ID, and confirm.
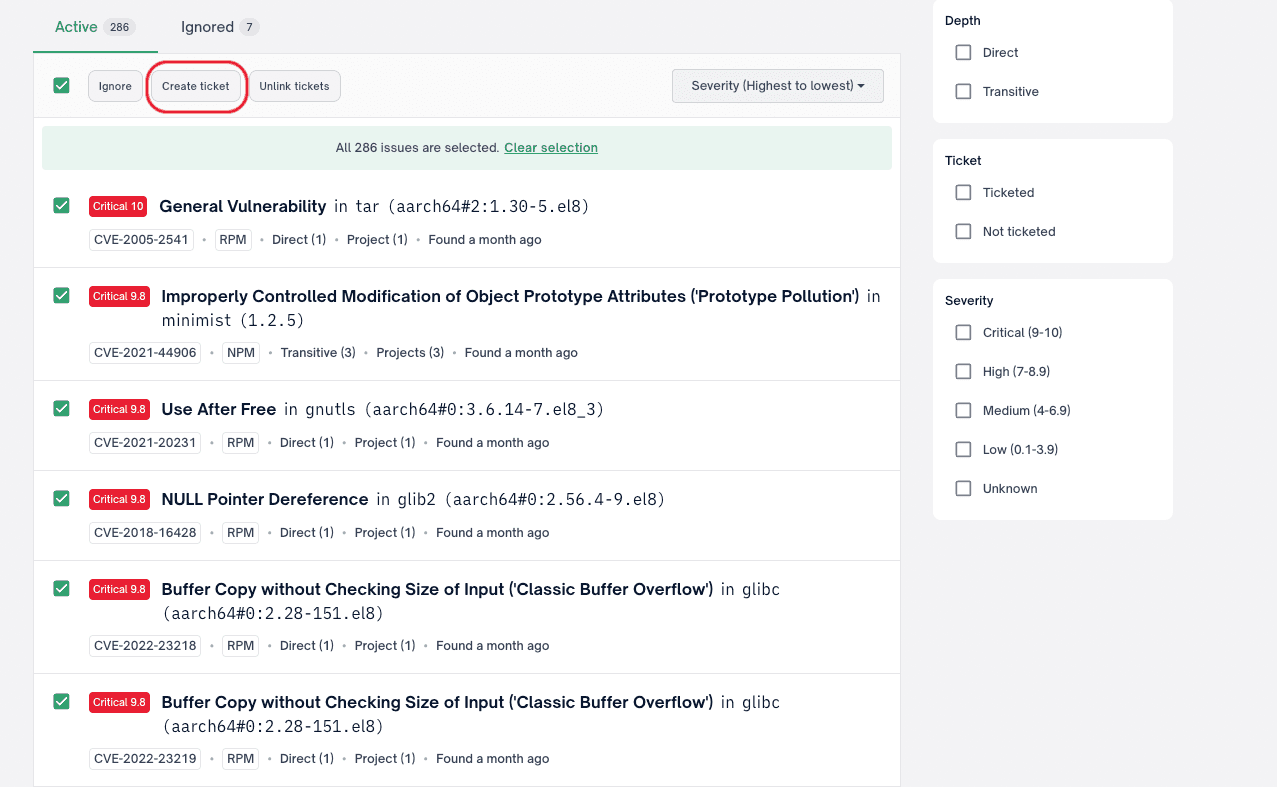
Danger
When creating a single ticket for multiple issues, only the first 50 issues receive full details in the ticket body. The remaining issues appear as links back to FOSSA.
Creating unique tickets per issue
Enable Unique Jira ticket per FOSSA issue in the Create Ticket modal to create one individual ticket per selected issue. Use the left/right arrows to review and edit each ticket before creating.
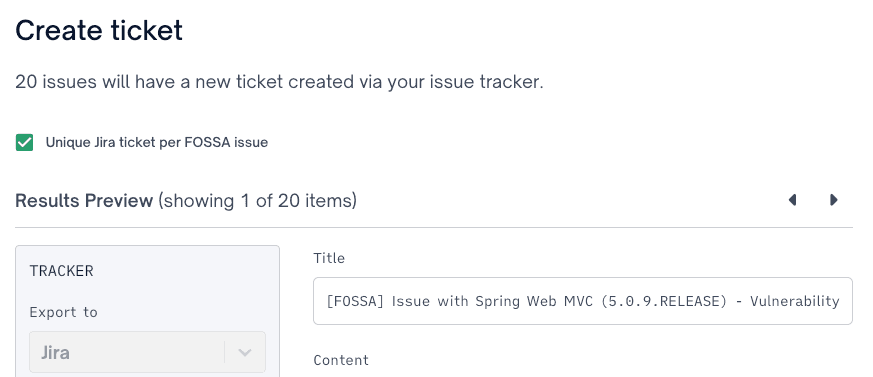
Warning
Unique ticket creation is limited to the first 50 selected issues due to Jira API limits.
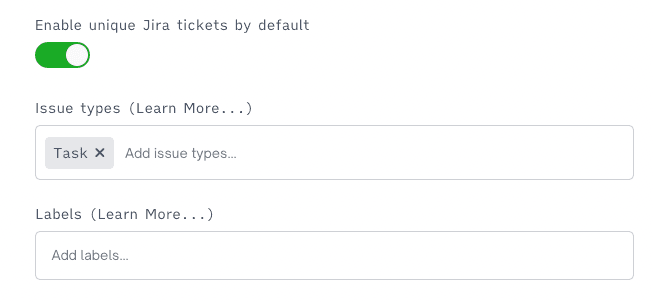
To make unique tickets the default for your entire organization, go to Organization Settings → Integrations → Jira and enable the setting there.
Creating URL-linked tickets
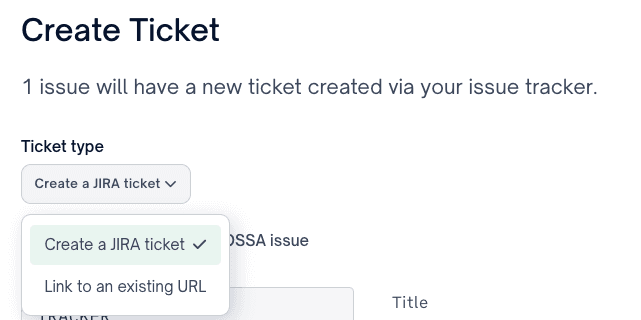
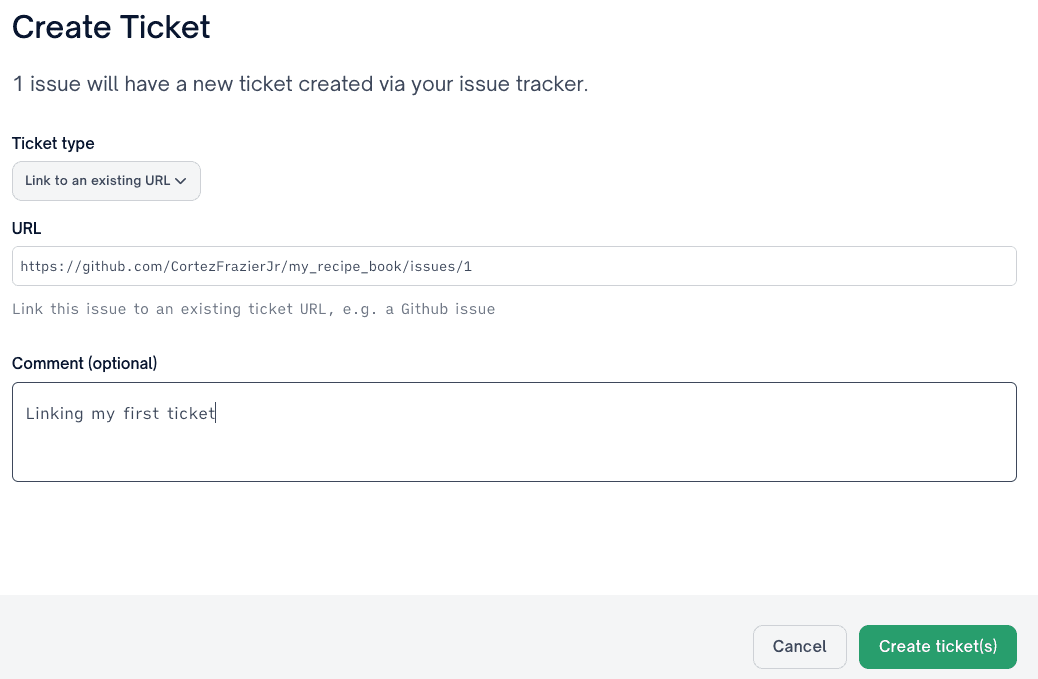
To link a FOSSA issue to an existing ticket in Jira (or any other ticketing system), choose Link to an existing URL when clicking Create Ticket.
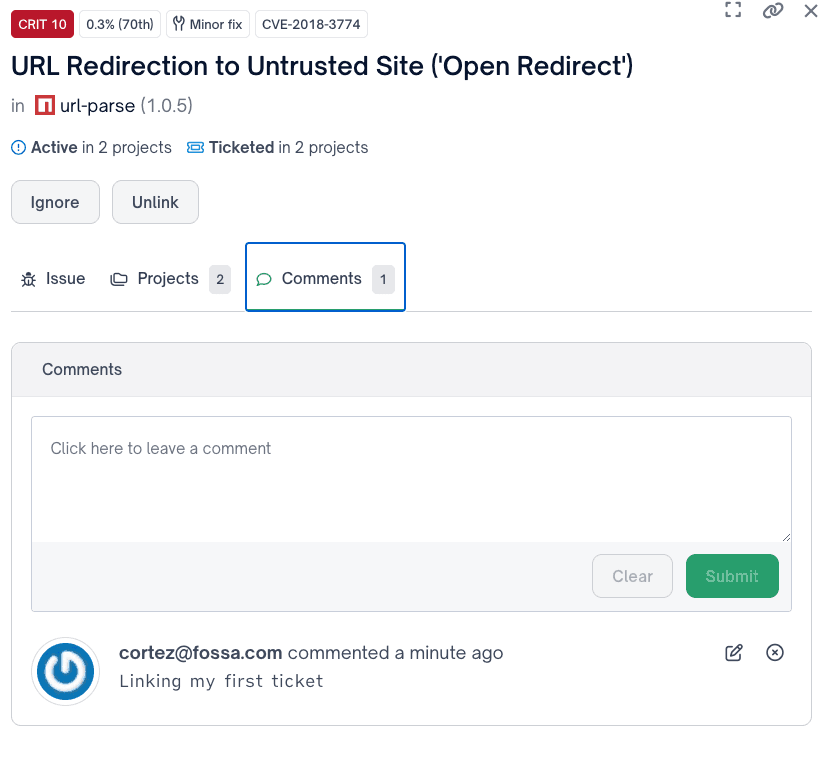
Supply the ticket URL and an optional comment. The comment appears on the tracked FOSSA issue.
Troubleshooting
"Failed to create issue" error
Failed to create issue. Make sure the configured Jira account has permission to create issues in the target Jira project.This message appears for several root causes, not only permissions problems. Work through the steps below before escalating.
Check basic configuration
| Setting | What to verify |
|---|---|
| Site URL | Formatted as https://yourcompany.atlassian.net/ with trailing slash |
| Username | Email address format, not display name |
| API token | Valid and not expired |
| Project key | Exists in Jira and the account can access it |
| Issue type | Matches a type in the project's issue type scheme |
Test the API manually
Before assuming a permissions problem, replay FOSSA's exact API calls with the same credentials you configured:
curl -X POST "https://YOUR-JIRA-SITE.atlassian.net/rest/api/2/issue" \ -H "Content-Type: application/json" \ -u "your-email@company.com:YOUR_API_TOKEN" \ -d '{"fields":{"project":{"key":"YOUR_PROJECT_KEY"},"summary":"Test FOSSA Integration","description":"Testing API compatibility for FOSSA integration","issuetype":{"name":"Bug"},"labels":["FOSSA"]}}'Match symptoms to root causes
| Symptom | Root cause | Fix |
|---|---|---|
| Generic permission error + manual API call succeeds | Field configuration | Enable the description/summary fields for the issue type in project settings |
| Permission error + manual API call also fails | Actual permissions | Grant the user "Create Issues" permission in the project |
| Issue type error | Missing issue type in project scheme | Add the issue type, or configure FOSSA to use one that already exists |
| Custom field error | Required custom field missing from payload | Make the field optional in Jira, or set a default value in FOSSA |
| Connectivity / SSL error | Wrong URL or network issue | Verify the Jira base URL; confirm FOSSA can reach it |
Webhook not resolving issues
Check that the webhook URL registered in Jira exactly matches the URL shown in FOSSA's integration settings. Each Jira site you configure gets its own unique URL; if you added a second site, register a separate webhook for it.
Confirm the webhook is set to fire on Issue updated and Issue deleted events, and that the account used to configure it has Jira Administrator permissions.
Issue type Task is missing
FOSSA defaults to the Task issue type. If your Jira project has removed or renamed it, either add Task back to the project's issue type scheme or configure a different issue type in FOSSA's integration settings.
See Atlassian's Unable to move issue due to invalid issue type article for further help.
Advanced debugging
To capture detailed API logs from Jira's side:
- 1
Enable debug logging in Jira
Go to Jira Administration → System → Logging and profiling. Add the package
com.atlassian.jira.restat log level DEBUG. - 2
Reproduce the failure
Attempt to export a FOSSA issue while the debug logging is active.
- 3
Review the logs
Check the Jira logs for the specific API call details and error codes returned.
To verify connectivity and credentials independently of FOSSA:
# Test that Jira is reachablecurl -I "https://yourcompany.atlassian.net/" # Test that credentials workcurl -u "email:token" "https://yourcompany.atlassian.net/rest/api/2/myself"Support escalation
Escalate to FOSSA engineering when:
- Manual API calls succeed with the same credentials but the FOSSA integration still fails.
- Field configuration appears correct but ticket creation still returns errors.
- API responses suggest FOSSA is sending a malformed request body.
- Multiple customers report the same failure pattern.
Include in the escalation:
- API test results (both successful and failing calls with response bodies)
- Jira project configuration details (issue types, required fields, project scheme)
- FOSSA integration settings (redact the API token)
- Exact error messages from API responses, not just the message shown in the FOSSA UI