Bitbucket Server (Stash)
This guide is for your Bitbucket Server/Atlassian Stash admin to set up FOSSA On-Prem's access to your internal code. Note: This was written for Bitbucket Server v4.0.6+
Set up Application Link
You first need to add an application link so that users with a login on Bitbucket Server can view their projects through FOSSA.
- Navigate to your local Bitbucket Server > Settings > Application Links.
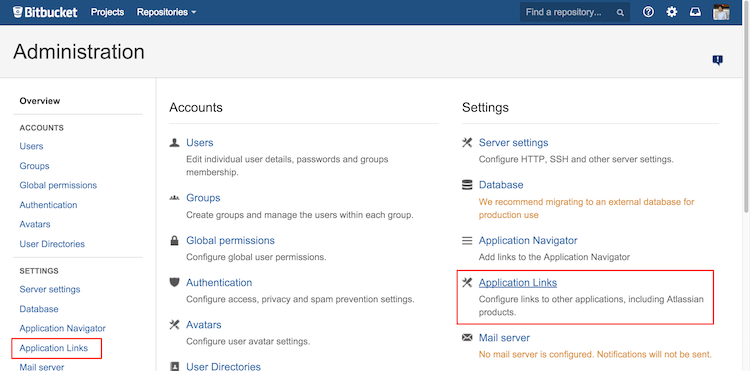
- Create an Application Link to FOSSA's internal IP

Fill in "fossa" for all options: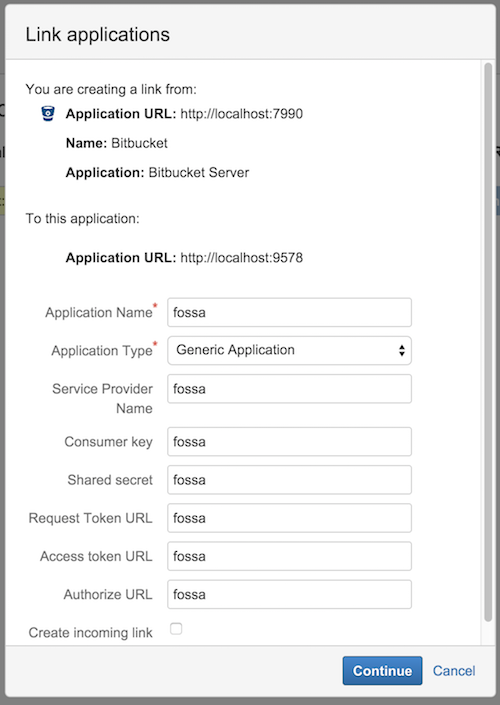
- Go to the new link and Edit > Incoming Authentication

Create a Public key
openssl genrsa -out privkey.pem 2048
openssl rsa -pubout -in privkey.pem -out pubkey.pem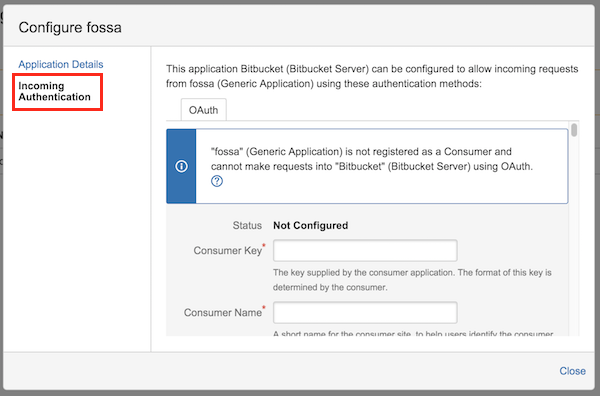
- Fill in the following settings and hit "Save" (leaving the rest blank):
Consumer Key: fossa
Consumer Name: fossa
Public Key: MIGfMA0GCSqGSIb3DQEBAQUAA4GNADCBiQKBgQCqGKukO1De7zhZj6+H0qtjTkVxwTCpvKe4eCZ0FPqri0cb2JZfXJ/DgYSF6vUpwmJG8wVQZKjeGcjDOL5UlsuusFncCzWBQ7RKNUSesmQRMSGkVb1/3j+skZ6UtW+5u09lHNsj6tQ51s1SPrCBkedbNf0Tp0GbMJDyR4e9T04ZZwIDAQAB
Now users can successfully connect their Bitbucket Server accounts with FOSSA.
Add 'fossabot'
FOSSA currently requires a companion bot account on your Bitbucket Server instance with global read access to analyze all internal repositories. This will be replaced in future updates, but is currently required for FOSSA to fetch code.
- Add
fossabotuser to Bitbucket Server
Go to Settings > Accounts > Users > Create User.
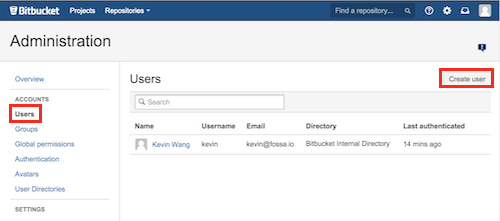
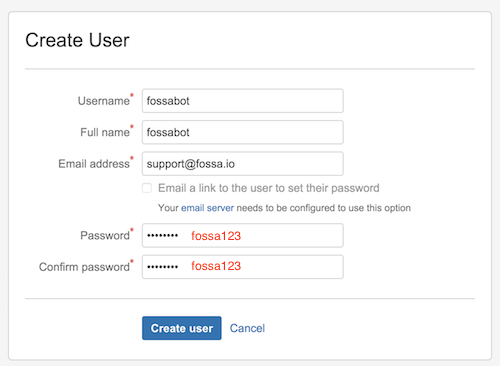
For username/password, use the bitbucket_server__credentials config in FOSSA's config.env (default below):
bitbucket_server__credentials__basic__username=fossabot
bitbucket_server__credentials__basic__password=fossa123-
Ensure
fossabothas global read accessfossabotneeds to be able to clone any repository in your instance of Bitbucket Server. The easiest way of doing this is giving the account admin privelages in Settings > Accounts > Global Permissions:
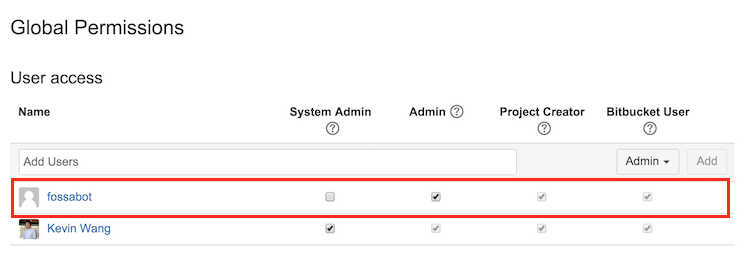
If you need to custom-configure a role for `fossabot`, make sure the account still has global read afterwards (i.e. try cloning repos across different projects as `fossabot`).Now you should be all set up! Users on FOSSA should be able browse and import their repositories on Bitbucket Server through Bulk Import.
NOTE: fossabot is not accessible to average users of FOSSA, but serves as an internal proxy for FOSSA to fetch code. Normal users will only be able to browse and import what they have access to normally through Bitbucket Server.
Automatic Updates
After importing, automatic updates need to be configured manually in two places for each imported project.
-
On FOSSA via Project > Settings > Update Hooks, select "Select Update Method...", choose
Webhookand hit Save Changes. -
On Bitbucket Server, install (if not done already) the webhooks module and enable them on each imported project. View guide here.
-
Copy & Paste Webhook Update URL from the first step to the webhooks in Bitbucket under Post-Receive Webhooks > Enable.
Fossa On-Prem bitbucket server configuration without ssh cloning
bitbucketEnterprise:
  url: http://bitbucket.test.com
  cloneWithSSH: false # to enable Git clones over SSH, set cloneWithSSH to true and configure fetchers.git.

  ## OAuth2 Credentials
  clientId: fossa
  #clientSecret:
  privateKey: |-
    -----BEGIN RSA PRIVATE KEY-----
    MIIEpAIBAAKCAQEAnFz3C4zivnXaOCSAMxtXL4bEe7RQTEboUi3JV62o+V5LKxJn
    1c0Mp+0SSHS+06i7UPkcCtblZbBMXGupjkMyJ+TGXIKFXdwdY8MyohVtgTcTcKFL
    HiW9bWbSx5x7zIqS78rNQWxsrBEJZgjDsfALtKXV/t7I1G1tEH84nEwF9D8VP/B8
    72xP6vSX2rlYX0IEh9ampEnU+riFnqpYR7CmMkeyrSKOsi6TuqachYIb9qjgNX/o
    EbNAjLcDdH28S/5nkmIEll+vhVbgeL8DJOt3gufSujE16EgqQN8UFfwRXyoAW1G7
    SRBdvDoqu0J5sZvIUpcA5/5tf6EZV0+iTlfcxQIDAQABAoIBADbxI41Xb8TkvEzF
    5pYOoU/91sRw01Y6BB/8HqdESf91down53xklHHdB3OWMgdFXqxRG91jLS/SBsLi
    wa1PRyxlYp3W7u3QDjOjvwLc7KFerOICitaJBEqQureQ8J8qgf7oD79RTc4YHmlP
    4xN++V38d3ka5w5ddNk7GrUwsVbk1ur13X+zpccntmwGUx/oXQxNmPF7TKUcKDmy
    sY2zeOyK1D0I63CHvxxZR3xrUL1jvyEtFdcSNIAwS8kIb+QDlz5O7eFQbhcq4TKA
    iuK9PMBdQ4GG4H5KNmQgjluT6WDO0yfncmOkGPcRi2O/W3UVNx9znQikTXeulR/u
    FWbYgAECgYEAz7t6urgSAUV6GrdQbLbegM26VJOWIOeuJlKzKo0NT03IpyKGgY9Y
    zFc/5c2X0Q7BPOA5Rjw+l35w+flGHs6el0t4AhBA0pD+mZFsJ/rlIlngNnA06a5N
    LXVLgfsF70jJvfu6T2/L0B08mUpvI3RD41mCYdN7FzkuF3HkMoA4+AECgYEAwLHl
    rbMBIhppZU59m4CYjcTuaohckVczT+PsYZ5M/6WfL71VkJxUYdK+Z9vE+K1sref4
    3ofFMirQG/cOmxVezJCpZXYs6+Zqamr5D4KxGAtCLQACaW3BTjB8MpZg2ENf/iya
    SUNXACJoqctrg4wWhlaniXdOIVvhz8w3IMahBMUCgYEAzG307rHczjGAY7BJTmN8
    fod3OmpvkPxPDtnOBi7/jS7AK3K3qeLXAWlPsahtIkiB9JW455y8ADxnlCkzT3gI
    7F1Rwb4a/N3CIIDTTlkDi5WlKA2ulNV6kCThZQ4THhOkrfl/tVMQ4UMUcsqkquBt
    OtzIidskRIt6B4qGhwhWiAECgYEApKadqald24UT79N8sqXUNLdEPVVdO3d2Sdpo
    fhUkmAEuHz254kIiPCA2QEpiaVbOmV6woX0Du9UnU+3r1goRodwuUpsC0WNmJJ5Z
    SK6UogXkuszaQrncxfHZ/ePOxpvzZx03jEh1C5FbO1KtAI9wI8Phji2aXhjDv6ow
    pNn0dj0CgYAp8meFNCQouZRfnwpytOzt6eQUziliYYAVPJZvM9LfhwPua20dRAJx
    Sx9v+duVnOePkWNRTOL4meF6zlxq9sCsuO8qtj0X2qYHzts+UP7HtM3yXNtOsxUZ
    iic9TOz4cCyl2vKaXm8RJ/CxQIxkWmxzOsHigpH8VrzHWugIRQMnyw==
    -----END RSA PRIVATE KEY-----

  ## Basic Auth Credentials
  username: fossabot
  password: fossa123
Note: Use the same "privateKey" which you created from step 3 from set-up-application-link
If you have any problems, contact support at [email protected]. This guide was written for Bitbucket Server v4.0.6+.
Updated 7 months ago
