TravisCI
Integrating FOSSA with TravisCI
This guide is for you to set up a FOSSA project with a TravisCI workflow.
Getting Started
The TravisCI integration requires fossa-cli our open source dependency analysis client, to be installed on your CI machine. The client supports all 3 major operating systems (Unix, Darwin/OSX and Windows).
To test the CLI, you can install it in your local environment using the command below or download it directly from our Github Releases page.
curl -H 'Cache-Control: no-cache' https://raw.githubusercontent.com/fossas/fossa-cli/master/install-latest.sh | bash

# view `fossa` help text
fossa --help
Setup your TravisCI Environment
First, grab a FOSSA API Key from your FOSSA account under your Integration Settings.
NOTE: If you are the maintainer of a public repository you should consider making your API key a Push Only Token. You will likely be required to place the environment variable in your travis.yml file due to TravisCI's pull request security settings if you plan on accepting pull requests from forked repositories.

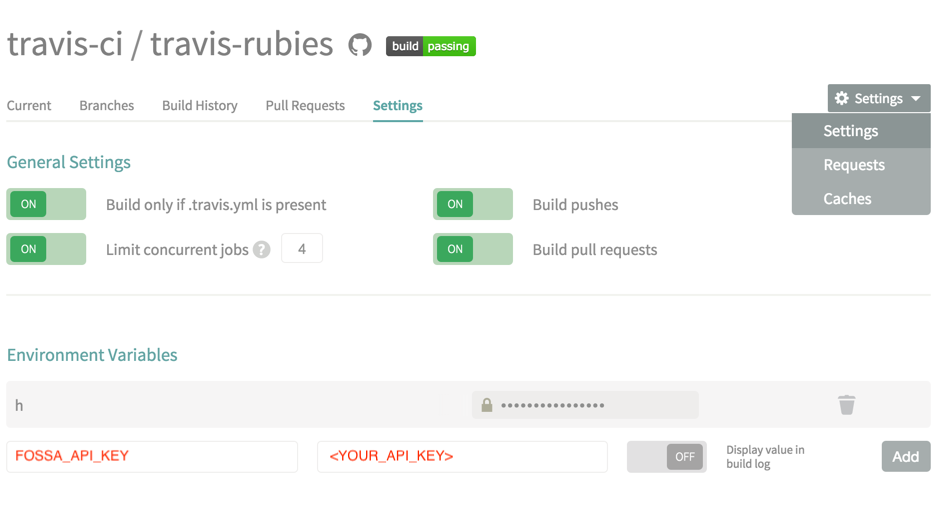
Then, add a TravisCI Environment Variable to your repository settings:

Add FOSSA steps to .travis.yml
.travis.ymlOnce the environment variable is ready, it's time to edit your .travis.yml file.
First, add a step to install fossa-cli when your build starts. Usually the best place to include this is before your script command at before_script when you're still installing the environment pre-reqs:
...
language: # your language i.e. node_js

install:
  # your typical install commands
  # i.e. `bundle install` for ruby or `npm install` for javascript

before_script:
	- "curl -H 'Cache-Control: no-cache' https://raw.githubusercontent.com/fossas/fossa-cli/master/install-latest.sh | sudo bash"

...
Next, add a step to run the fossa command you just installed in order to upload dependency data from your Travis build.
We recommend inserting the following under script so that fossa will still have access to a freshly-built environment before any tests run:
script:
  # your build scripts before running `fossa`
  # NOTE: before running `fossa` make sure to save your FOSSA_API_KEY in your
  # environment variable in Travis see below.
  - fossa analyze
Now with every CI build, you will be uploading a dependency report back to your hosted FOSSA instance.
Customizing with.fossa.ymlTo customize your
fossatask behavior, add a.fossa.ymlfile to the root of your VCS.View the .fossa.yml reference on GitHub.
Blocking CI Builds w/ FOSSA Issue Status
You an also create a step in TravisCI that will allow you to pass/fail a build based off your scan status in FOSSA.
To accomplish this, simply add a call to fossa test into your after_success section.
after_success:
		- cd <SOURCE_DIR> && fossa test
The fossa test command will poll app.fossa.io or your local FOSSA appliance for updates on your scan status until it gets a response. Then, it will report a relevant exit status to the CI step (to block a failing build) and render rich details about issues directly inline your TravisCI test results.
You can customize a timeout on this step using the fossa test --timeout {seconds} flag documented here. The default timeout is set to 600 seconds (10 minutes), but will only be hit in exceptional cases -- most scans should return well under the timeout window.
Triggering Updates with Webhooks
In exceptional cases, you may require your CI to tell FOSSA to pull an update for your code. This is not necessary for most users, but can be accomplished if you are using Automated Builds and have no other possible update strategy.
To do this, add the following to your travis.yml file:
notifications:
  webhooks: https://app.fossa.io/hooks/travisci
You will also have to update your project settings in FOSSA by navigating to Project > Settings > Update Hooks, and selecting TravisCI in the dropdown.
Updated 7 months ago
